ArchitecturesAI · Guide · Updated November 6, 2026
How to present architectural renders to clients, step by step
A good render can still lose the room. Clients get twenty images, no clear order and no question to answer, so they say "let me think about it" and the project waits. The images are rarely the problem. The way they are shown is.
Below is a simple way to present renders: know who decides, show two or three options from the same camera, tell the design as a short story and end with one next step. We used our free AI architecture generator to make the options from a single starting image, and the figures show each run with its settings. If you use AI images, label them as concept images. That is covered in step 6.
In short
- Find out who decides and what they care about
- Match the polish of the image to the stage
- Start every option from one image, so the camera stays the same
- Make two or three options that change one thing each
- Check every image before it goes in the deck
- Label the images and put them side by side
- Tell the design as a short story
- End with one clear next step
The starting image
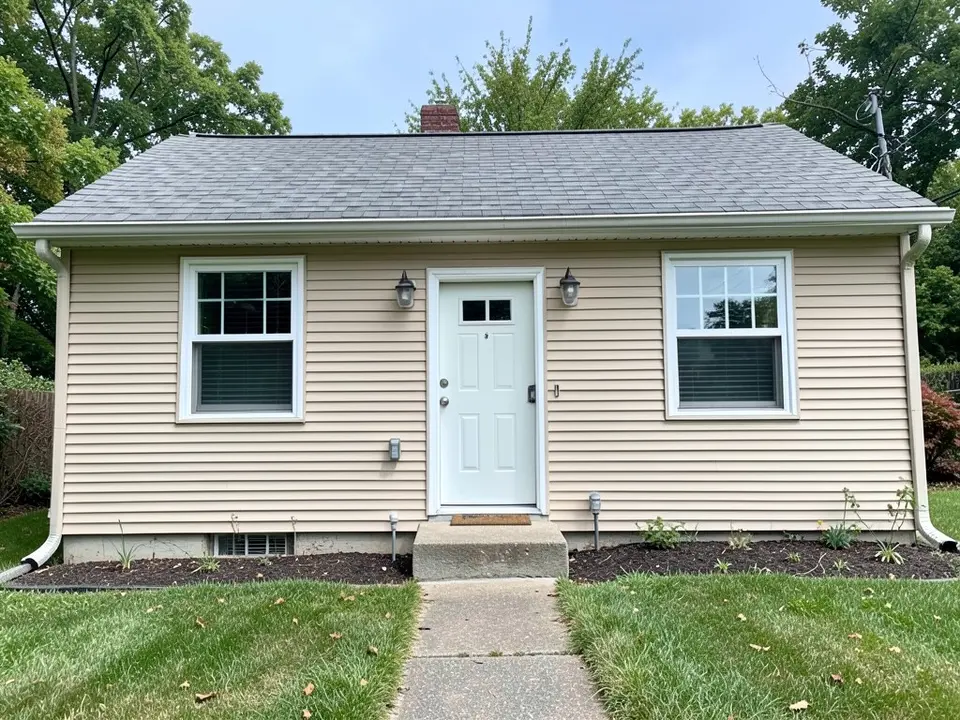
Settings: Used for every option below. Mode Render Architecture, sample house from "No photo handy? Try a sample house"
How to present architectural renders to a client, step by step
1. Find out who decides and what they care about
Before you make or show anything, ask who signs off and what each person worries about. One person may care about the look, another about cost, another about the programme. Plan what each of them needs to see, and invite them all to the meeting. A decision that has to be reopened later costs more than a longer meeting now.
2. Match the polish of the image to the stage
A very finished image tells the client the design is nearly done. If you are still at concept stage, say so in words and keep the image at concept level. Rough, loose images invite comments. Polished images invite a yes or a no. Early on, you want comments.
3. Start every option from one image, so the camera stays the same
Pick one view that shows the building well, such as a front three-quarter view at eye level. In the generator, open "Select Mode" and choose "Render Architecture", then upload that one image under "Please select an image" ("Select Image"). Use "✂ Crop / rotate" if the framing needs fixing. Use this same image for every option, so the client compares designs and not camera angles.
No image yet? A screenshot of a SketchUp or Revit view works well. You can also press "No photo handy? Try a sample house" to follow along.
4. Make two or three options that change one thing each
Under "Architecture Type" pick the building type, then pick a different chip under "Style" for each option. Keep everything else the same. If the question for the client is light, not style, keep the style and change "Time of day" instead: open "Lighting, time of day & weather" and pick, for example, "Late Afternoon" for one run and "Twilight Dusk" for the next. Press "Generate Architecture" once per option.
Two or three options is the usual advice. One option gives the client nothing to compare. Five or more makes them freeze. The AI works from your image, but it also changes things you did not ask for. In our four runs the wall material changed every time, the roof material changed in three, and steps, lights and window frames changed too. Check each option against the starting image.
5. Check every image before it goes in the deck
Put each result next to the starting image and look for drift: the door or windows moved, the number of storeys or bays changed, the wall or roof material changed, steps were rebuilt, rails, a bench, solar panels or a roof feature appeared, the lights were restyled, a car or tree appeared, a neighbour changed. If an extra object keeps showing up, type it into "Leave out (optional)" and run again. For a small fix on a result you like, use "Quick edits" under the image, such as "Materials" or "Landscaping". Use "↻ A clearly different take" if the option is close but not right.
6. Label the images and put them side by side
Tell the client these are AI concept images, in words and on the page. In the generator, "Sizes for Instagram & stories" has a "Caption on the picture" box where you can add a line such as "AI concept image" before you download a size. Press "Download" for every option you keep, because results are not saved to a list on the site. Then put the options next to each other on one slide, in the same order and size, with the starting image beside the one you recommend as a before and after.
Say what the images are and are not. They show look, mood and material ideas. They are not drawings, they do not show exact sizes, and the final design will be checked against the real site, structure and rules.
7. Tell the design as a short story
Do not list features. Walk the client through it: what is on the site now, what you propose, what changes the way the building feels, and why. Open with your strongest image, then the options, then one detail. Use plain words. Say "this window brings morning light into the kitchen", not the name of the drawing type.
8. End with one clear next step
Finish by asking for one decision: which option to develop, by when, and who decides. Then send a short follow-up pack the same day. In the generator, "Print / save as PDF" lets you pick the paper size and add a "Project or client name (optional)" and notes under the picture. If you have edited a result, "Download all N versions (.zip)" and "Print all versions / save as one PDF" collect them. Keep the main presentation to a few key views and put the rest in this pack.
Free to try. Upload one image, pick a style, and make each option from that same image.
One image, three options, one change of light
Each result is one run of Render Architecture from the starting image above, with the settings shown. Between options A, B and C we changed only the style setting. For the last image we kept style A and changed only the lighting setting. The settings changed one at a time, but the pictures did not. The AI also changed the materials and details on its own, and the last image is not the same building as option A. The captions say what changed.
Option A: Modern
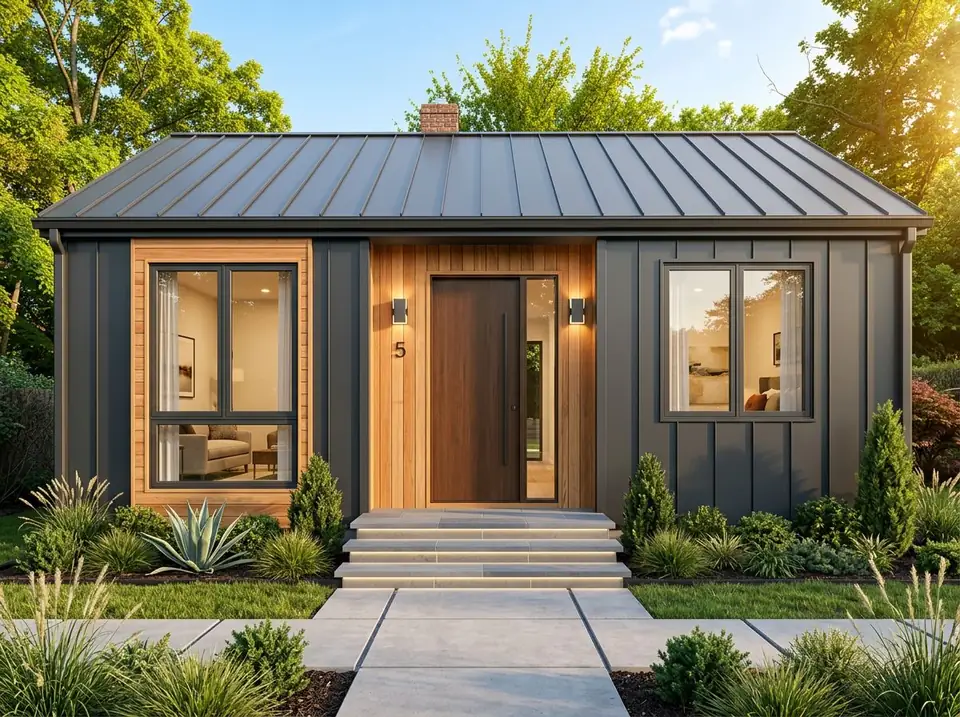
Settings: Mode Render Architecture, Architecture Type Residential, Style Modern, Time of day Late Afternoon, Weather Sunny
Option B: Scandinavian
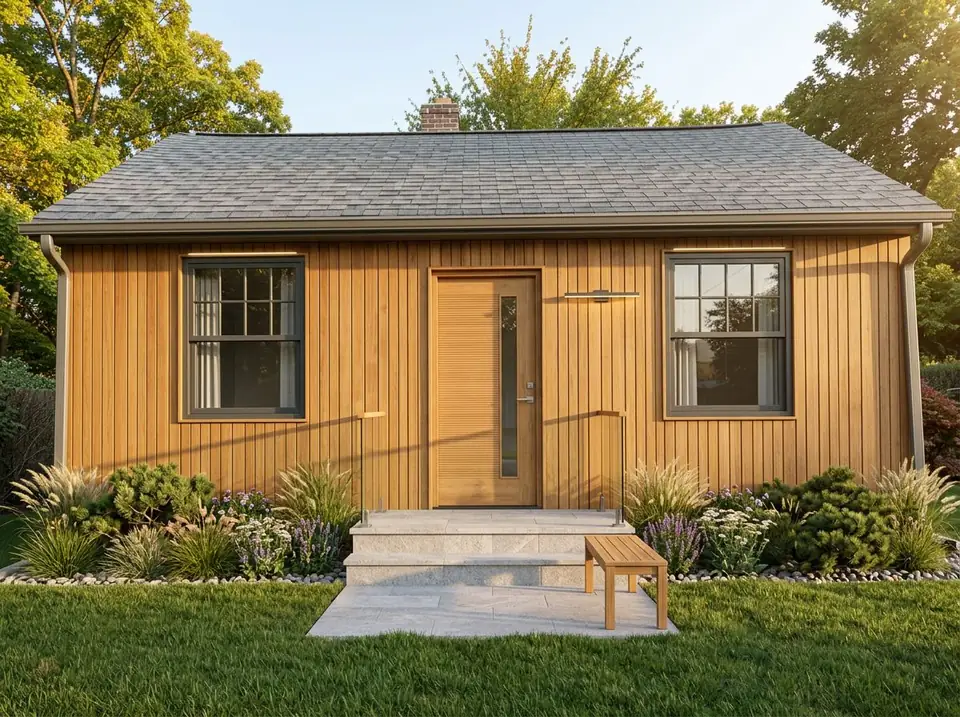
Settings: Mode Render Architecture, Architecture Type Residential, Style Scandinavian, Time of day Late Afternoon, Weather Sunny
Option C: Mediterranean
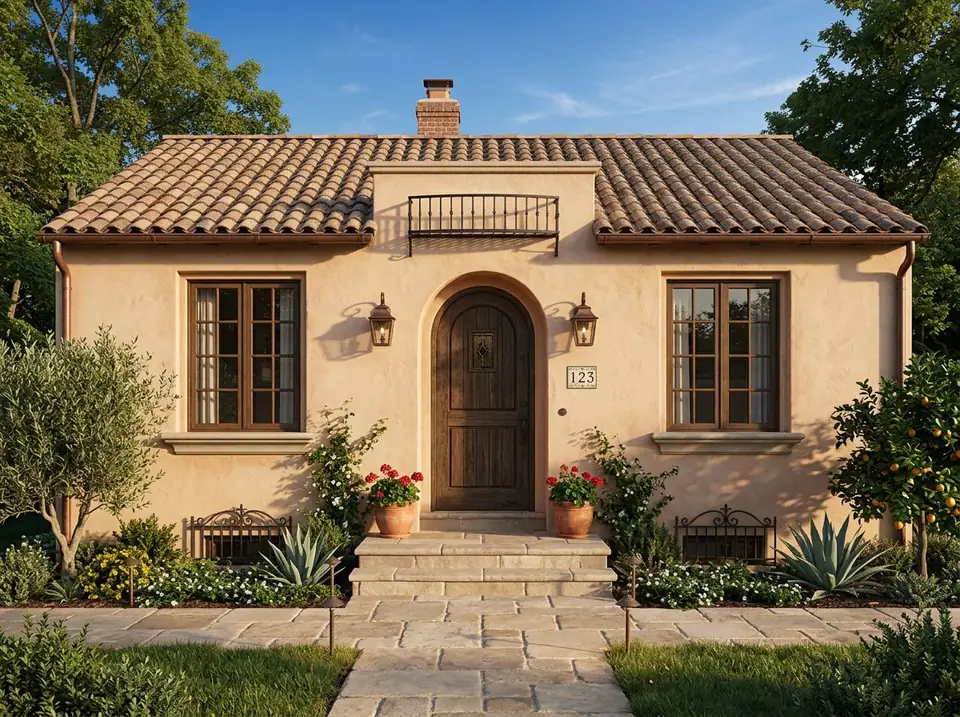
Settings: Mode Render Architecture, Architecture Type Residential, Style Mediterranean, Time of day Late Afternoon, Weather Sunny
Option A, one change: Twilight Dusk
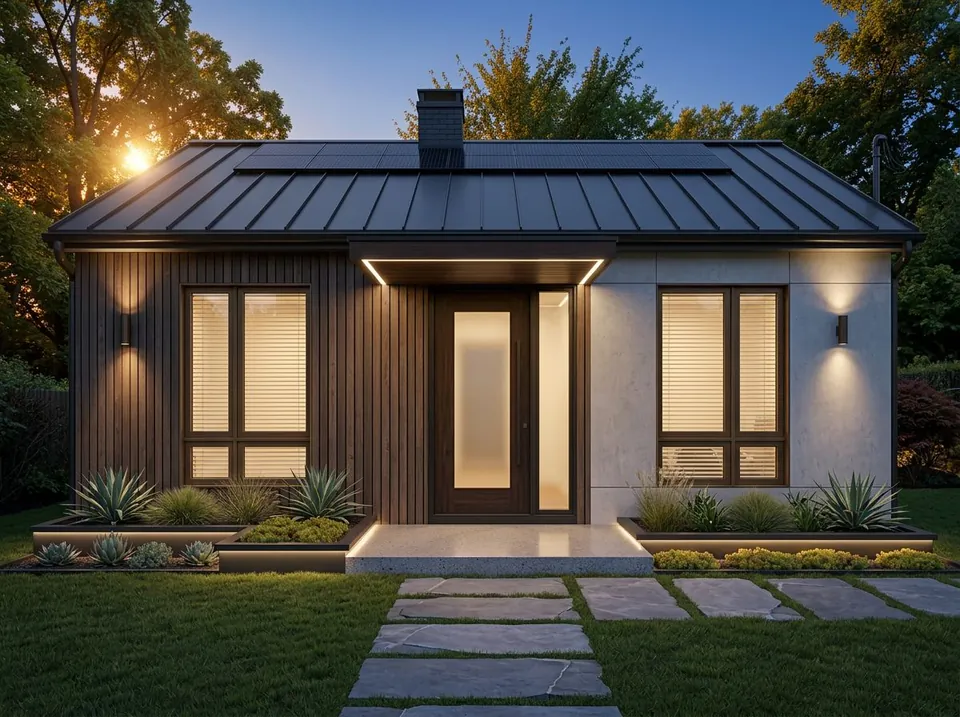
Settings: Mode Render Architecture, Architecture Type Residential, Style Modern, Time of day Twilight Dusk, Weather Sunny
Together the four images work as a side by side: one camera, one footprint and clearly different moods. The honest miss is drift. Every run changed the wall material and restyled the wall lights, and every run replaced the plain concrete step. Three runs changed the roof material. Option C adds a roof feature, and the dusk image has a new canopy and solar panels that option A does not have. Check each image against the starting image and tell the client which changes are AI ideas.
What to put in the deck, and in what order
Keep the main presentation short. A client sees the first views best and tires by about the eighth. Show a handful of key views per option and hold the rest back for the follow-up pack.
- The starting view, so the client sees what exists today.
- Your hero image, the one you most want them to remember.
- Two or three options on one slide, same camera, same size, same order, each with a one-line title.
- One before and after: the starting image next to the option you recommend.
- One detail that answers a worry you heard in step 1, such as materials, light or the entrance.
- The question: which option, who decides, and by when.
What AI renders can and cannot do in a client meeting
- They are concept images. Use them to talk about look, light and materials, not to show sizes, structure or compliance. Keep your drawings next to them.
- They can drift. Windows, doors, counts and heights can change between runs, even from the same image. Check each option against the starting image, and never promise a client the exact detail you see.
- They look finished. A polished image can make a client think the design is fixed. Say "concept" out loud and write it on the page.
- Label them. Put "AI concept image" next to the image, in readable type, not in a footnote. Clients trust you more when you say it first.
- One run is one roll of the dice. If an option is close, run it again or use "Quick edits" before you decide it does not work.
Frequently asked questions
How many renders should I show a client?
Show two or three options for each big decision, and keep the main presentation to a handful of key views per option. Send the rest afterwards in a follow-up pack, so the meeting stays about the decision.
How do I keep the camera the same across options?
Start every option from the same uploaded image and change only one setting at a time. In our Render Architecture mode each run kept the camera and footprint, but the AI also changed the wall material every time, the roof material in three of four runs, and details such as steps, lights and roof features. Even a light-only change gave a different building, so check each result against the starting image before you show it.
Should I tell clients a render was made with AI?
Yes. Say it in the meeting and put "AI concept image" next to the picture. In our generator you can add that line in the "Caption on the picture" box under "Sizes for Instagram & stories" before you download. Check the rules of your market and your professional body as well.
Should I show floor plans or renders first?
Renders first for most clients. Plans, sections and elevations are shorthand that many clients cannot read, so show the picture, then use the plan to explain how the layout works.
Can I print or send the renders as a PDF?
Yes. Under a result, "Print / save as PDF" lets you choose the paper size and orientation and add a "Project or client name (optional)" and notes that print under the picture. When you have edited a result, "Print all versions / save as one PDF" puts each version on its own page.
Can an AI render be a final deliverable?
Treat it as a concept image. It is useful for early direction and client talks. A final presentation, a planning submission or marketing material for a real build needs a design that has been checked and drawn, and images made from that design.
Make your options from one image
Pick one view, make two or three options from it, check each against the original, label them as concept images, and finish with one question for the client.
Render a view of your projectRelated: Architectural visualization · AI architectural rendering · SketchUp to render · 3D rendering services · AI prompts for architecture renders