Photo to architectural sketch
Photo to Architectural Sketch with AI
Upload a photo of a house, a street front or a room, and ArchitecturesAI can turn it into a drawing that looks made by hand: black ink lines, soft pencil, or ink with pale marker colour. It takes two steps in the tool. Standard Enhancement enlarges and cleans up your photo without redesigning it, and a Custom Action on that result asks for the sketch. In our three examples the sketch kept the storeys, windows, doors, roof line, furniture and camera of the photo, but it simplified textures, left the sky or road as blank paper and added small marks. Treat it as an illustration, not a measured drawing.
Sketch your building photoSign in with Google or email to render. New accounts get 2 free renders (watermarked); free renders are not available in India on this site.
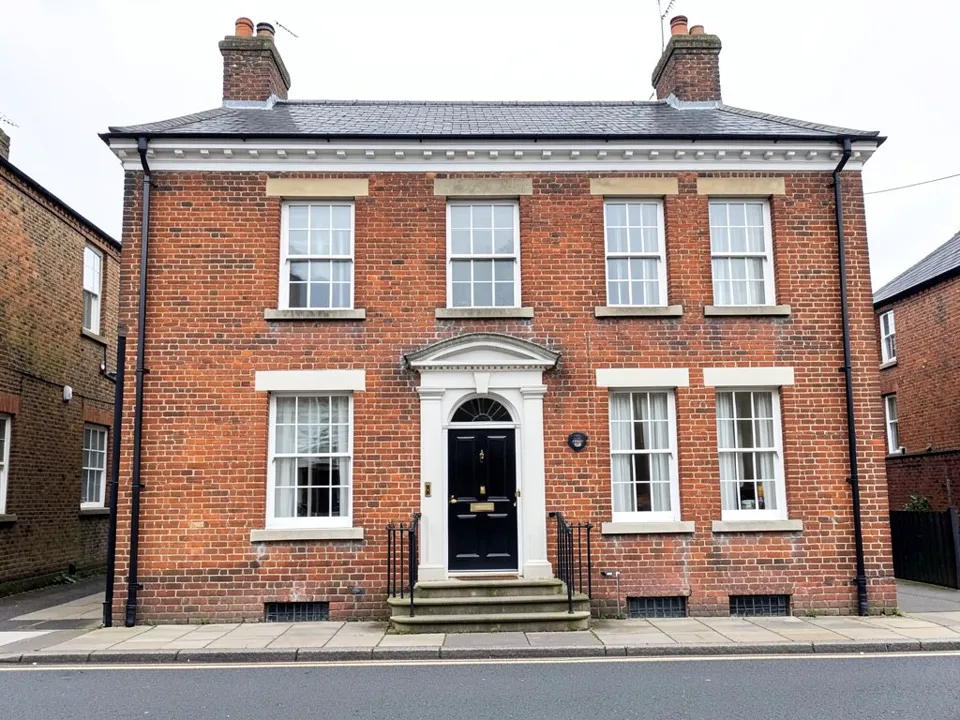
Before: brick house photo (AI-drawn stand-in)
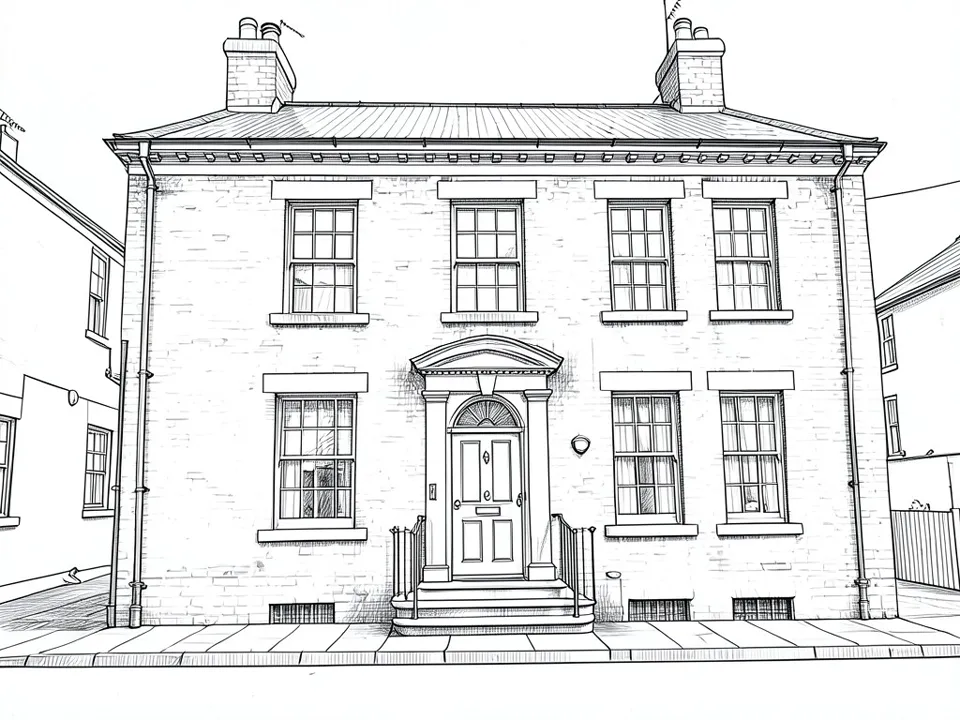
After: black ink line sketch
What a photo to architectural sketch is
It is a drawing made from a photo of a real building or room, in the look of a hand sketch: ink line work, graphite pencil, or ink with marker shading. The photo supplies the shape, the windows and the camera; the sketch strips out colour, texture and clutter so the eye reads form and proportion.
People use these drawings on presentation boards, in portfolios, on property listings and as gifts or prints of a home. Drawing one by hand from a photo takes time and a steady hand. The AI does the drawing for you, and you check the result against the photo.
How to turn a photo into a sketch with ArchitecturesAI
- Pick a photo taken straight on or at a gentle angle, in daylight, with the whole building or room in the frame. Save it as a JPG or PNG.
- Click "Sketch your building photo". The Enhancement tool opens with Standard Enhancement already selected under "Select Enhancement Option". Sign in with Google or email.
- Under Source Image, click "Select Image or Drag & Drop" and upload your photo.
- Leave Enhancement Strength on Medium and Quality on Low; Medium (PRO) and High (PRO) quality need a paid plan, and free results carry a watermark.
- Press Generate Enhancement. This step enlarges and cleans up the same photo; it does not restyle or redesign the building.
- Click the "Custom" button above the enhanced result (the window is titled "Custom AI Action") and paste a sketch text into Custom Instructions, such as: "convert to a black ink architectural line sketch on white paper, with clean precise lines and light hatching for shadows, no colour; keep every window, door, chimney and roof line where it is". Custom Action works on the enhanced result, not on your upload, and it uses credits too. On a new free account, the two steps use both free renders. If the enhanced image has a watermark, the mark may show in the sketch.
- Download the sketch. The examples on this page sent the sketch text directly to our image model from the photo, without the enhancement step, and the live Custom Action uses a different one of our models, so your result will differ.
Ink, pencil or marker: pick the look in words
There is no style menu for the sketch itself. You choose the look by what you write in Custom Action. These three texts are the ones used on this page; change the last part to name what matters in your building.
- Ink line drawing: "convert to a black ink architectural line sketch on white paper, with clean precise lines and light hatching for shadows, no colour". Crisp and graphic, good for boards and print.
- Pencil: "convert to a soft graphite pencil architectural sketch on white paper, with clean lines and light hatching for shadows, no colour". Softer edges and grey tones, good for modern houses and glass.
- Ink and marker: "convert to an architectural marker sketch on white paper: black ink outlines with soft grey and pale colour marker shading". Keeps a hint of colour, good for interiors and concept pages.
- End each one with "keep every window, door, chimney and roof line where it is", or name the walls, columns or furniture in your photo. It helps the AI hold the drawing to your photo.
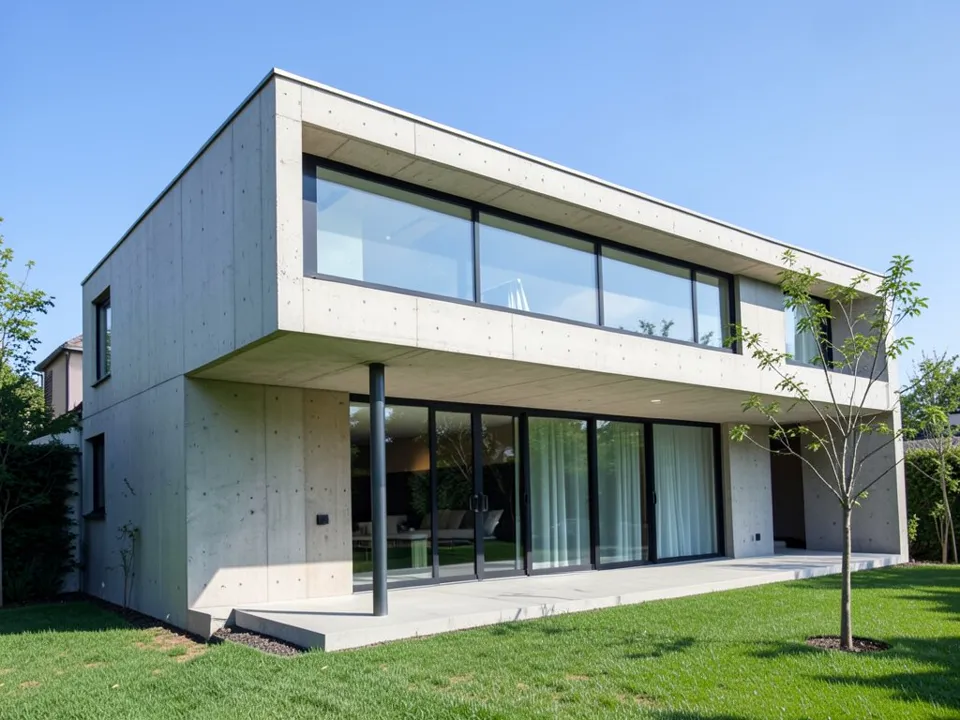
Before: concrete house photo (AI-drawn stand-in)
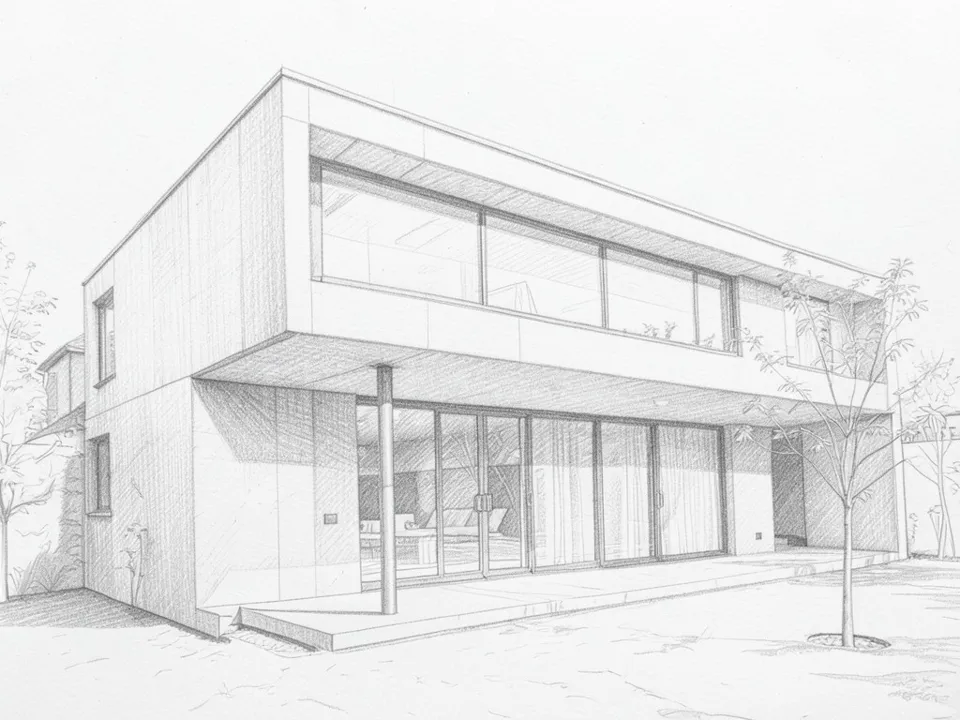
After: soft pencil sketch
What the sketch keeps and what it may change
All three examples show the same pattern, so use it as a checklist when you compare your sketch with your photo.
- Usually kept: the camera, the number of storeys, the windows and doors, the roof line and chimneys, steps, railings and columns, and in a room the walls, window, fireplace and furniture layout.
- Turned to outline: dark or coloured parts, such as a black front door, when the text asks for no colour.
- Often simplified: brick and concrete texture, the sky, the road and the lawn, which may turn into blank or lightly shaded paper.
- Sometimes added: small things you did not ask for, such as stray marks, a redrawn neighbouring building or a button on a chair. Check the edges and small items.
- Never produced: a measured or scaled drawing, a plan or elevation you can build from, or a layered vector file. The download is an image.
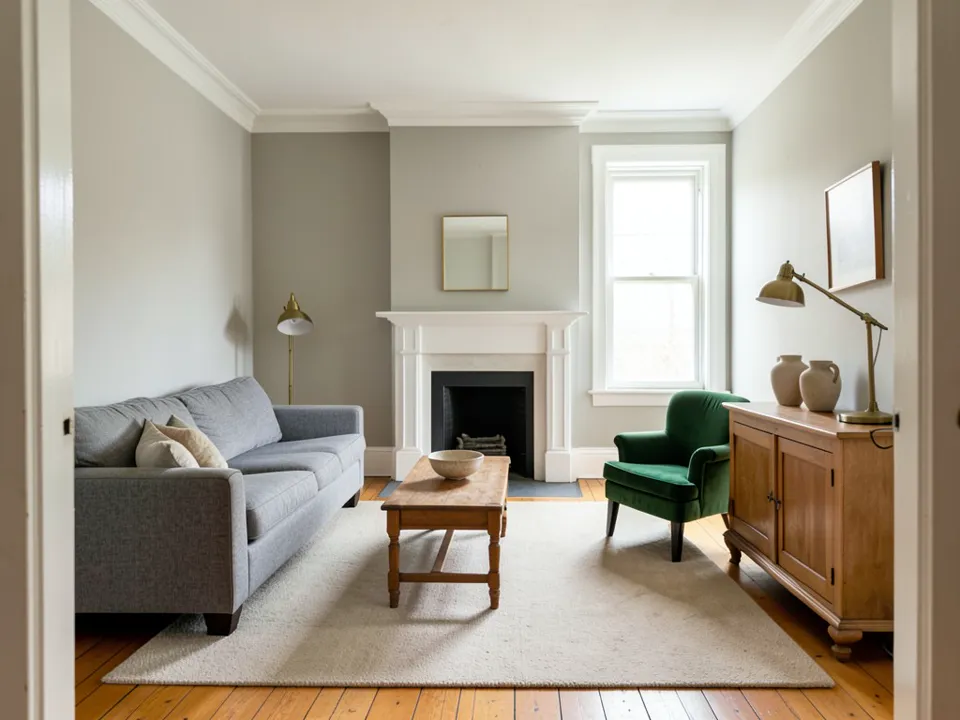
Before: living room photo (AI-drawn stand-in)
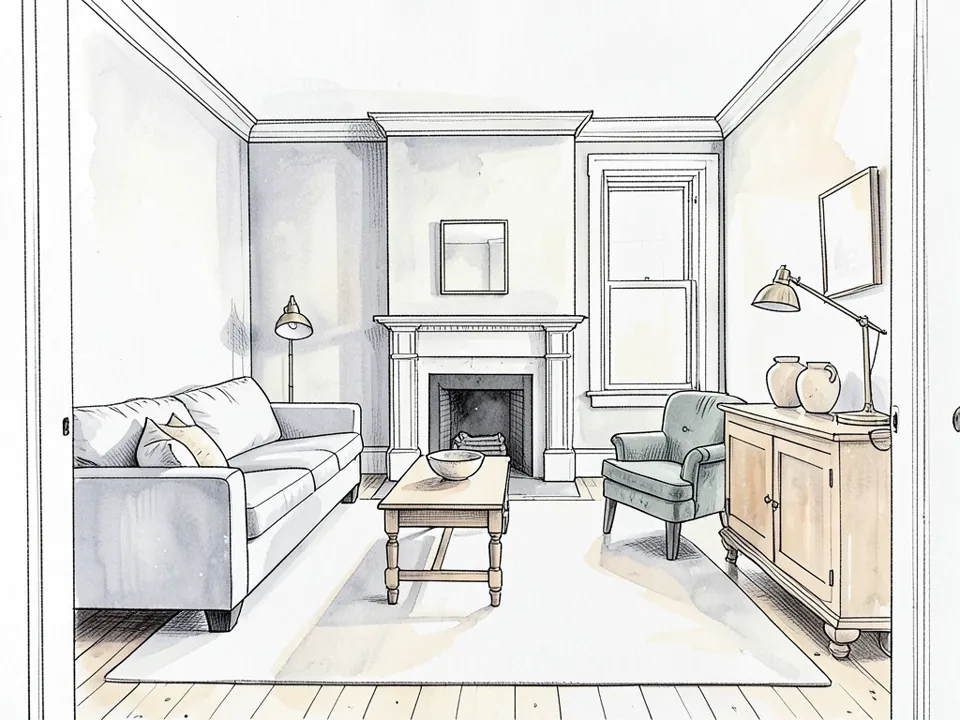
After: ink and marker sketch
Tips for a cleaner sketch
- Shoot square to the building. A straight-on or gentle three-quarter view gives straight verticals; a steep upward angle gives leaning lines.
- Keep cars, bins, people and branches out of the frame where you can; the AI draws whatever is there.
- Crop out signs, number plates and street names. The AI may redraw them as stray marks.
- Name the parts you care about at the end of the sketch text, such as the porch, the bay window or the fireplace.
- If the sketch gets something wrong, use the Edit or Custom button on the sketch with a short fix, such as "remove the mark on the pavement". Each extra action uses credits.
Who uses it
- Architects and designers who want a hand-drawn look of an existing building for a proposal, a heritage note or a before-and-after board.
- Architecture and interior design students preparing a portfolio page or a site study.
- Estate agents and homeowners who want a drawing of a house for a listing, a card or a framed print.
Free tier and plans
You need a free account to render. New accounts get 2 free renders, and free renders carry a watermark. In India this site does not include free renders, so a paid plan is needed there. Weekly, monthly and yearly plans for more renders without the watermark are on the pricing page.
Because a sketch takes Standard Enhancement and then a Custom Action, a new free account has enough for one sketch. The sketch is drawn from the watermarked enhanced image, so the mark may appear in it. The "before" images on this page are AI-drawn stand-ins, not photos of real buildings.
Frequently asked questions
What kind of photo works best?
A sharp daylight photo with the whole building in frame, taken straight on or at a gentle angle, with few cars, trees or people in front. Clear edges between walls, windows and roof give the cleanest lines. Very dark, blurred or fisheye shots give weaker results.
Why does it take two steps?
Custom Action, where you write the sketch text, appears on a generated result, not on your upload. Standard Enhancement gives you that result without redesigning the building: it enlarges and cleans up the same photo. Custom Action then turns it into a sketch. Each step uses credits; on a new free account the two steps use both free renders.
Can I choose pencil, ink or marker?
Yes, in words. Write the look you want in Custom Action, such as black ink line drawing, soft graphite pencil, or ink with grey marker shading. The three texts used on this page are printed above and in the captions.
How accurate is the sketch?
In the three examples it kept the storeys, the windows and doors, the roof line and the camera of the photo. It is not exact: textures get simplified, the sky or road can drop to blank paper, and the AI can add small marks or redraw a neighbouring building. It is not measured or to scale, so use CAD or a survey when you need real dimensions.
Does it work on interiors?
Yes. Upload the room photo the same way; the Enhancement tool has no interior or exterior choice. The living room example kept the walls, window, fireplace and furniture layout, but added a button to the armchair and turned the lamp’s shadow into a hard grey patch, so check small items in your result.
Can I turn a 3D render into a sketch?
Yes. Upload the render instead of a photo and follow the same two steps. A clean render with clear edges gives clean lines.
Can I use the sketch commercially?
Read our terms of service before you use a sketch in paid work. They say you are responsible for the content you upload, so only upload photos you have the right to use, such as your own photos or your own project.
Is it free to try?
Yes. After you sign in, a new account gets 2 free renders with a watermark, which is enough for one sketch (Standard Enhancement and a Custom Action). In India this site does not include free renders. Paid weekly, monthly and yearly plans are listed on the pricing page.
Turn your building photo into a sketch
Upload a photo, run Standard Enhancement, then ask Custom Action for an ink, pencil or marker sketch and download it for your board, portfolio or listing. A new free account has enough renders for your first sketch.
Sketch your building photoRelated: Enhancement tool (Standard Enhancement) · Sketch to render AI (the reverse: sketch in, render out) · AI render enhancer · AI architectural rendering · Terms of service · Pricing