ArchitecturesAI · Guide · Updated November 6, 2026
How to design a backyard with AI, step by step
Most people start a backyard project with a bare lawn and a vague idea. It is hard to know if a patio, a new fence or a different kind of planting will look right until it is built. An AI design tool lets you try the idea on a photo of your own yard first.
Below is the whole process, from the photo to a plant list you can take to a garden centre. We ran one yard photo through our landscape tool and show each result as it came out, including what to check before you trust it. The results are concept images, not plans.
The starting yard
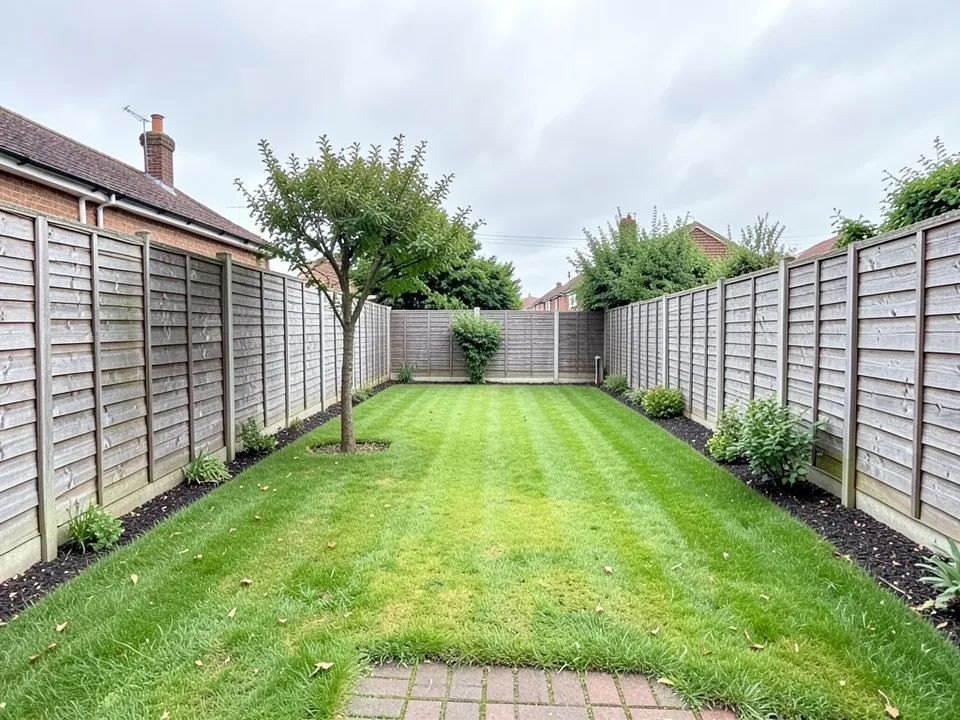
How to design a backyard with AI, step by step
1. Decide what the yard has to do, and what stays
Write down three things before you open any tool: what the yard is for (play, dining, pets, growing food, quiet), what must stay (a tree, a fence, a drain cover, a shed) and what you can change. A short brief keeps you from making ten random designs and liking none.
If children or pets use the yard, say so now. It changes what you will ask for later, such as soft ground or a fenced corner.
2. Photograph the whole yard
Stand at the back door or a corner of the yard and fit as much of the space as you can into one photo. Shoot sideways, in daylight, with the camera level so fences and walls stay straight. Bare soil, old lawn and a bit of mess are fine.
Take a second photo from the far end looking back at the house. You may want to design that view too, and each photo is a separate design.
3. Upload the photo and make a first design
Open the landscape design tool. Drop your photo into the box that says "Drag & drop your garden photo here", or tap a sample under it: "Back garden" or "Pool yard". If the photo is sideways, use "✂ Crop / rotate" on the preview. If it is dark or tinted, try "Fix lighting". Then press the Generate button at the bottom of the left panel.
On the main page that button reads "Generate Safe Design", but with no mode picked it asks for a general landscape design. If you are signed out, you will be asked to sign in before the result shows, and the design runs once you have signed in. The result appears under "Results".
First design
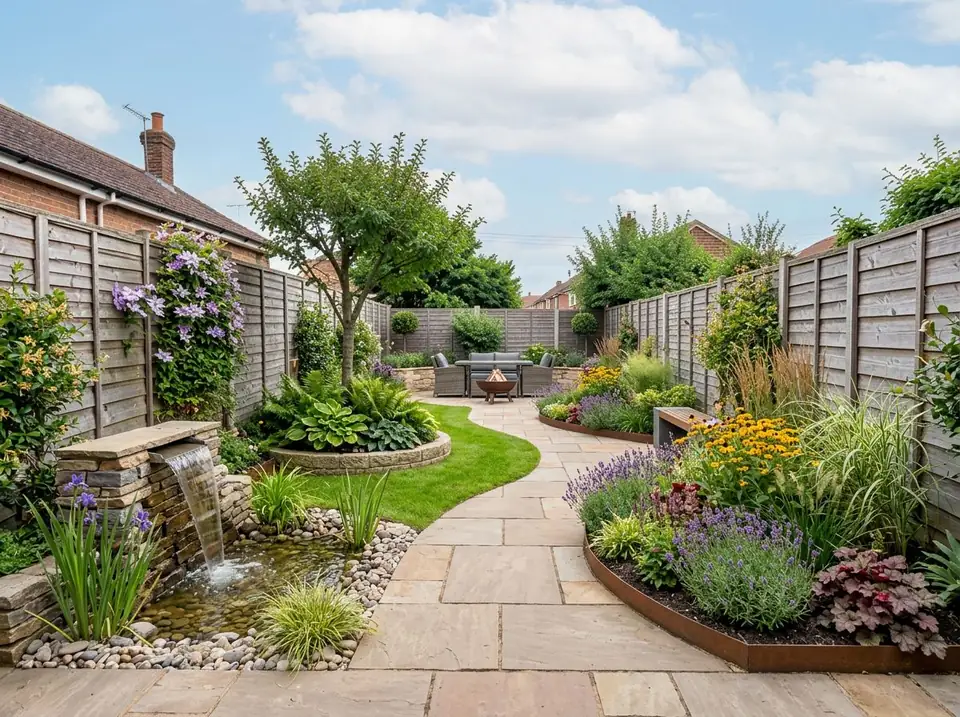
Settings: Photo: Back garden sample; no mode picked; Generate
4. Change one thing at a time with Quick edits
Under the result you will find "Quick edits". Pick a group such as Fence, Ground, Water, Plants, Outdoor or More, then tap a chip: a stamped concrete patio, a stepping-stone path, a fire pit with seating, a stone fountain. Each tap edits the picture you are looking at.
Change one thing per edit. If you add a patio, a pond and a pergola at once and the result looks wrong, you will not know which one caused it. Tick "Pick several" only when you want a few items from the same group together. Every result is kept under "Versions", and "↶ Undo" steps back. For your own idea, use the boxes under the chips: "Add at a spot", "Remove", "New background" and "Change ___ to ___".
5. Compare two or three styles from the same start
There is no style menu before you generate, so try styles with Quick edits. First tap "First" in Versions, so each style starts from the same first design. Then open the "More" group and tap "Make it a cottage garden", or "Make it a Japanese garden with bonsai and raked gravel". For any other look, type it in the "My own style" box and press Go.
Go back to "First" before each new style. If you do not, the second style is built on top of the first and you get a mix. The "↻ A clearly different take" chip makes a different layout in the same style.
6. See the yard in other seasons
A yard that looks good in July can look bare in January. For a seasonal view, use the "Season" group in Quick edits, for example "Show the garden in autumn colours" or "Show the garden in winter". Or open the "Season Garden Viewer" tile under "Select Landscape Mode", upload your photo, pick Spring, Summer, Autumn or Winter under "Season", and press "View Seasonal Changes".
Pick a season before you press the button. A season is needed for the viewer to work. The "More" group also has "Show the planting fully grown, about 10 years from now", which is useful when you plant small trees.
7. Build a plant list
In the left panel, above the Generate button, open "Plant ideas (height, sun, style)". Filter by height, "Plant type", "Garden style" and "Sun", tap a plant to see what goes well with it, and tap "+ Pick" to add it to "My plant list". Use "Copy list" to take it to a nursery or garden centre.
The list is for planning. It is not sent with your photo, so it does not change the picture. To see planting in the picture, use the "Plants" chips in Quick edits, or the "Native plants for" box and type your region. Always check the plants against your local climate and soil.
8. Check the result, then take it to a pro
Compare the result with your photo. Fences, the house and the boundary should be where they were. The AI also adds things you did not ask for, such as a pond, seating or a new path, and can change the sky, so treat those as ideas. Look for items placed on a slope, over a drain or against a wall where they would not fit. Press "Download" to keep the picture you like best.
Treat the picture as a concept. It shows an idea, not sizes. Before you build, measure the space, check drainage, buried pipes and cables, and local rules for fences, decks and trees, then show the picture to a landscaper or designer.
Upload one photo of your yard and press Generate. You will be asked to sign in to see your result.
One yard, three styles
Each result below starts from the same first design, with one style applied from Quick edits. Nothing was retouched. A style can change more than the plants: the Japanese run also reshaped the tree.
Cottage garden
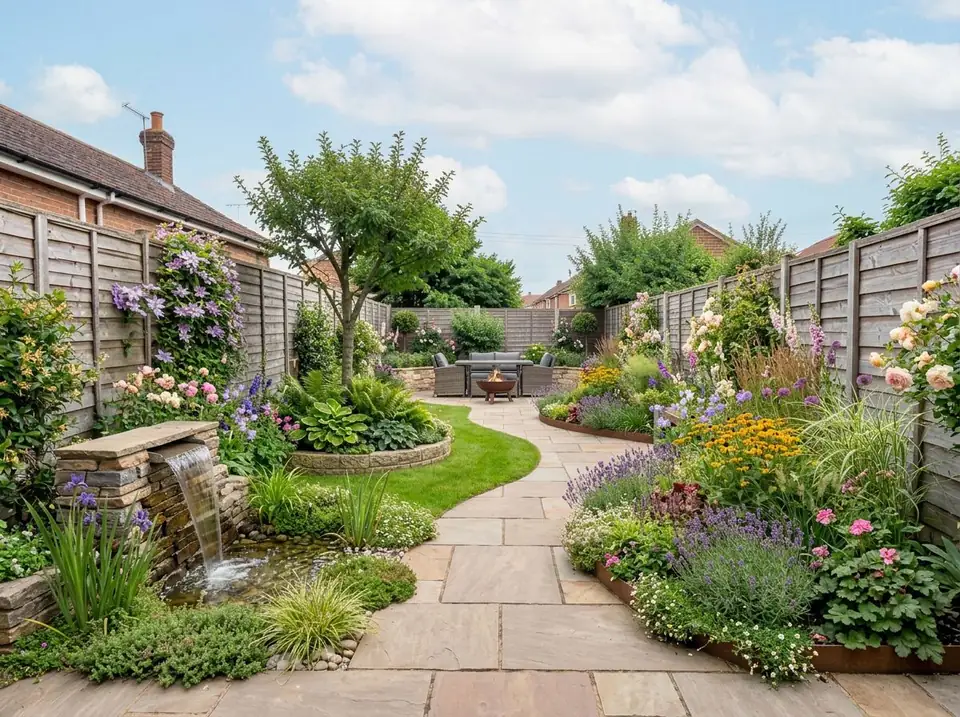
Settings: Version: First; Quick edits: More: Make it a cottage garden
Japanese garden
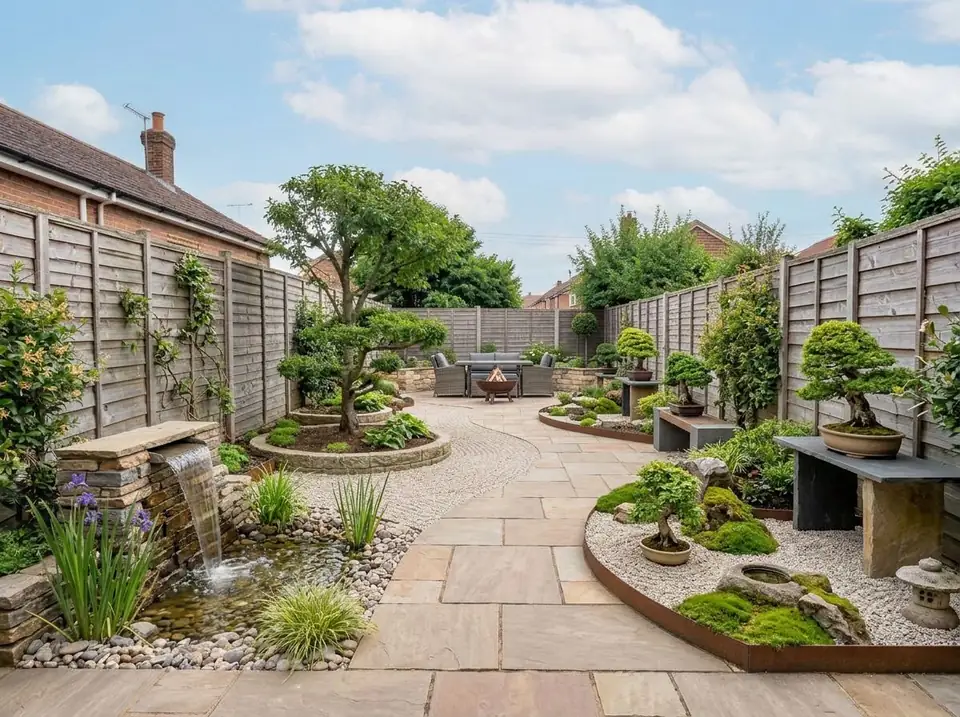
Settings: Version: First; Quick edits: More: Make it a Japanese garden with bonsai and raked gravel
My own style
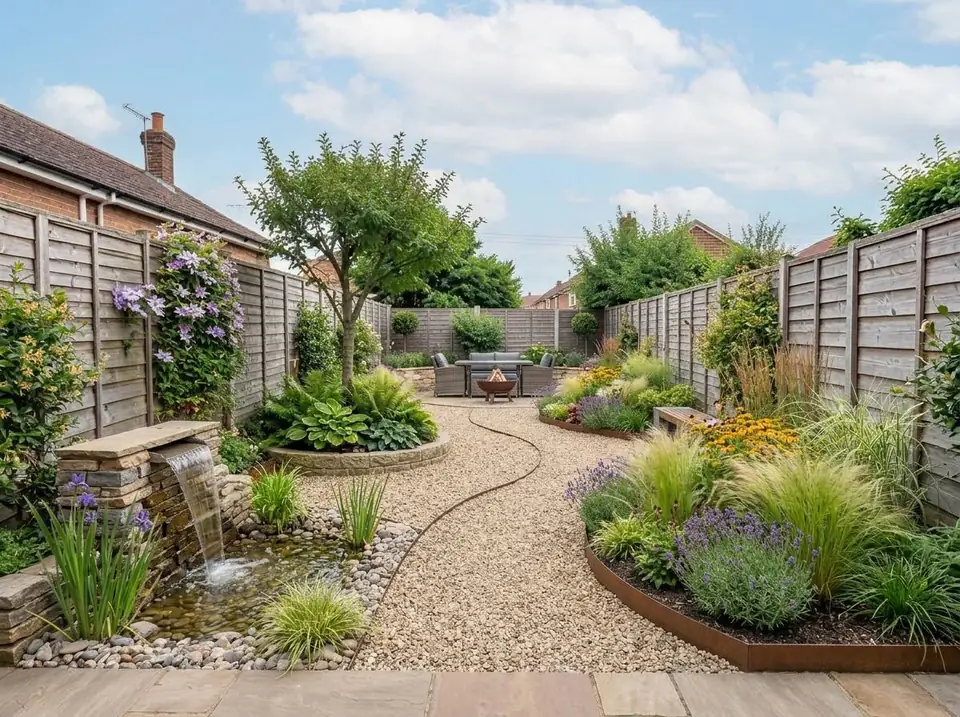
Settings: Version: First; Quick edits: My own style: modern with gravel paths and ornamental grasses
In all three, the house, both fences, the pond and the seating area at the back stayed in the same places, and mostly the planting, the ground and a few props changed. Only the Japanese run also changed the tree and the climber on the left fence. Compare every result with the first design before you pick one.
The same yard in two seasons
One result comes from the Season Garden Viewer and one from the Season group in Quick edits, so you can see both routes. They start from different bases. The viewer starts from the original photo. The Quick edit starts from the first design. So the two pictures show different gardens, and you cannot compare them side by side.
Autumn, Season Garden Viewer
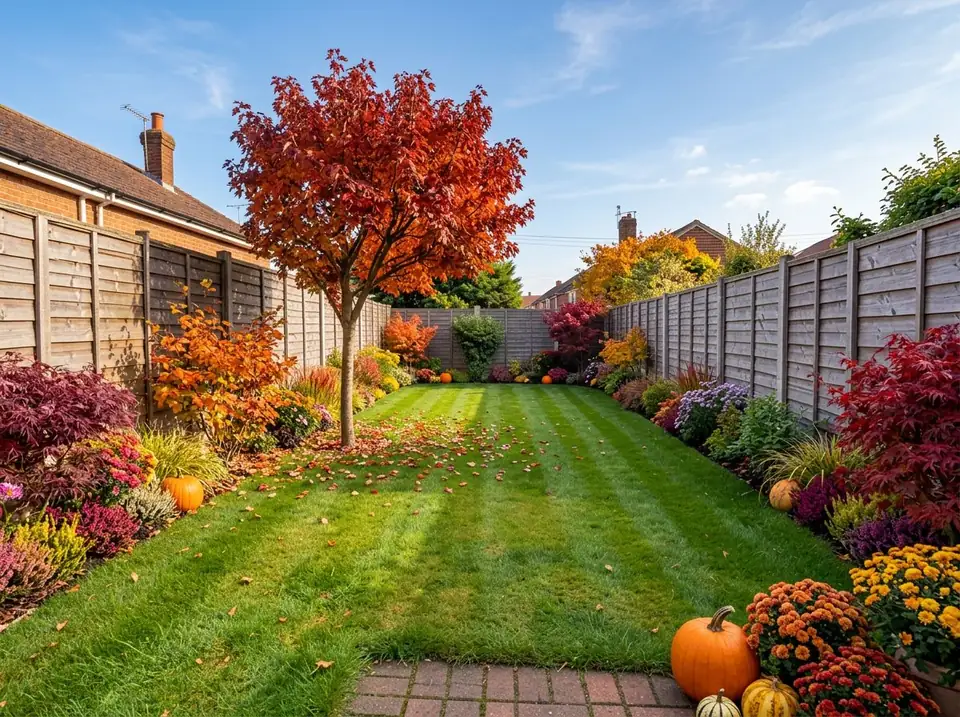
Settings: Mode: Season Garden Viewer; Season: Autumn; View Seasonal Changes
Winter, Quick edits
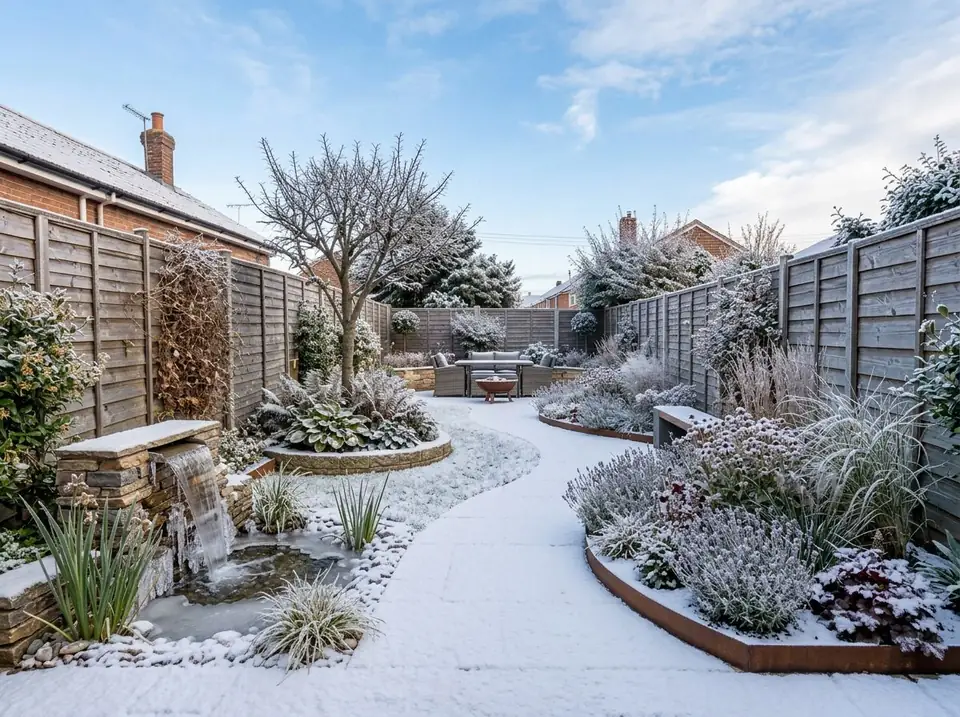
Settings: Version: First; Quick edits: Season: Show the garden in winter
What an AI yard design can and cannot do
It can show an idea fast, on your own photo, so you can talk about it and compare options. It is good for deciding between a patio and a lawn, a hedge and a fence, a cottage look and a modern one.
It is not a plan. The picture has no real dimensions, no drainage or grading, no utilities and no plant hardiness data. Plants and items may be bigger or smaller than they would be in real life, and the angle can drift from your photo. Use it to decide what you want, then get measured plans and local advice before you spend money.
Frequently asked questions
How do I design a backyard with AI?
Take a bright photo of the whole yard, upload it to a landscape design tool, make a first design, then change one thing at a time with edits. Compare styles and seasons from the same first design, and check the result against your photo before you build.
Can I try a backyard design without my own photo?
Yes. The tool has two sample photos under the upload box, "Back garden" and "Pool yard", so you can see how it works before you use your own yard.
Can AI pick the plants for my backyard?
It can show planting in the picture, and our tool has a plant ideas list you can filter by height, type, style and sun. The list is for planning and is not sent with the photo. Check every plant against your local climate and soil.
Can I see my backyard in winter or autumn?
Yes. Use the Season group in Quick edits, or the Season Garden Viewer, where you pick Spring, Summer, Autumn or Winter and press "View Seasonal Changes".
Is the AI design accurate enough to build from?
No. It makes a concept image, not a plan. It does not know the size of your yard, the slope, the soil or where pipes run. Use it to choose a direction, then get measured plans from a landscaper or designer.
What photo works best?
A bright, level, sideways photo from the back door or a corner that shows the whole yard. Straight fences and a clear view of the ground give the AI the most to work with.
Design your first yard
Take one bright photo of the whole yard and make a first design. Then try two styles from the same start, and keep the one you would be happy to build.
Design your backyardRelated: Small backyard ideas · Pool landscaping ideas · Landscape architecture rendering · Choosing exterior paint colours · AI prompts for architecture renders