ArchitecturesAI · Guide · Updated November 6, 2026
How to enhance real estate photos with AI, and what to leave alone
Most listing photos are fine until a buyer zooms in. Then a small file turns soft, a dim room turns grainy and the whole set looks cheap. AI can help with some of that, but not all of it, and "enhance" means different things in different tools.
This guide separates the jobs. Light, colour and angles are fixed before the AI step. Our Enhancement tool then enlarges the photo and cleans it up. We ran one deliberately weak sample photo through each of its options and show every result as it came out, together with what to check and what the rules say about labelling edits.
The starting photo
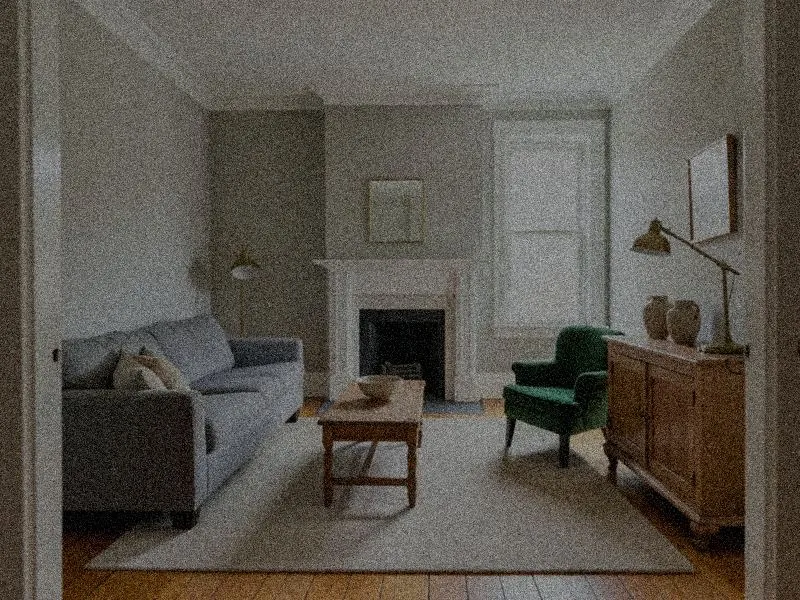
How to enhance a real estate photo, step by step
1. Shoot the best photo you can
Everything the AI does later works better on a good original. Turn on all the lights, open the blinds, shoot in landscape from a corner or doorway at chest height, and keep the camera level so walls stay straight. Use the phone or camera's full resolution, not a screenshot or a messaging-app copy.
2. Fix light, colour and angles first
Brightness, white balance and crooked verticals are not what our Enhancement tool does. It has no exposure, colour or straightening controls. Fix those in your phone's photo editor, Lightroom or another editor before you upload. If the room is too dark to fix, reshoot with the lights on.
3. Decide what the photo actually needs
A small, soft or grainy file is a job for the Enhancement tool. An empty room that needs furniture is a staging job. A 3D render is a different job again. Pick the one that matches, so you do not use an upscaler to solve a lighting problem.
4. Open the Enhancement tool and upload the photo
Go to the Enhancement tool and sign in with Google or email. Under "Source Image", choose "Select Image or Drag & Drop" and add your photo. The tool's own help lists JPG, PNG and WEBP files.
5. Pick an enhancement option
Under "Select Enhancement Option" there are three choices. "Standard Enhancement" is basic image enhancement and optimization. "Noise Reduction" removes noise and grain, which suits dim phone photos. "Detail Enhancement" is described as enhancing fine details and textures, though in our test it gave the same result as Standard. If you pick none, Generate runs Standard Enhancement.
When you pick an option, "Enhancement Strength" appears with Low, Medium and High. Medium is selected by default. In our test, Detail Enhancement gave the same picture at Medium and at High, so leave it on Medium.
6. Set the quality and press Generate Enhancement
Use the "quality" menu to set the size of the result. "Low" is the setting free accounts use. "Medium (PRO)" and "High (PRO)" need a paid plan. Then press "Generate Enhancement". The button shows "Processing..." while it works, and the result appears under "Enhancement Preview".
Free results are watermarked, and the "watermark" menu only offers "No watermark (PRO)" on a paid plan. Use a free run to test options, not to publish.
7. Check the result at full size
Use "Zoom" on the result, or the full-size link, and look at it next to the original. Check edges and straight lines, fine patterns such as brick, tile and blinds, faces of cabinets and windows, and anything that looked slightly off before. Smoothing can wipe out real texture, such as a stain or a scuff, and an upscaler invents detail it cannot see. If it looks plastic or smeared, run it again with a lower strength or a different option, then press "Download".
8. Label the edit and keep the original
Keep the untouched original. Many MLSs and listing sites ask you to disclose edits that change what the property looks like, and some ask for the original too. Sharpening and denoising are usually treated more lightly than adding, removing or changing things, but rules differ, so check your MLS before you publish.
Sign in with Google or email. New accounts get 1 free render, and free renders carry a watermark.
One weak photo, four enhancement runs
Each result is one run on the starting photo above with the options listed. Nothing was retouched afterwards. We ran the same models the tool uses but skipped the watermark step, so a free run of your own will also carry a watermark. Open each one at full size next to the original, and use the checks from step 7.
Standard Enhancement, Medium
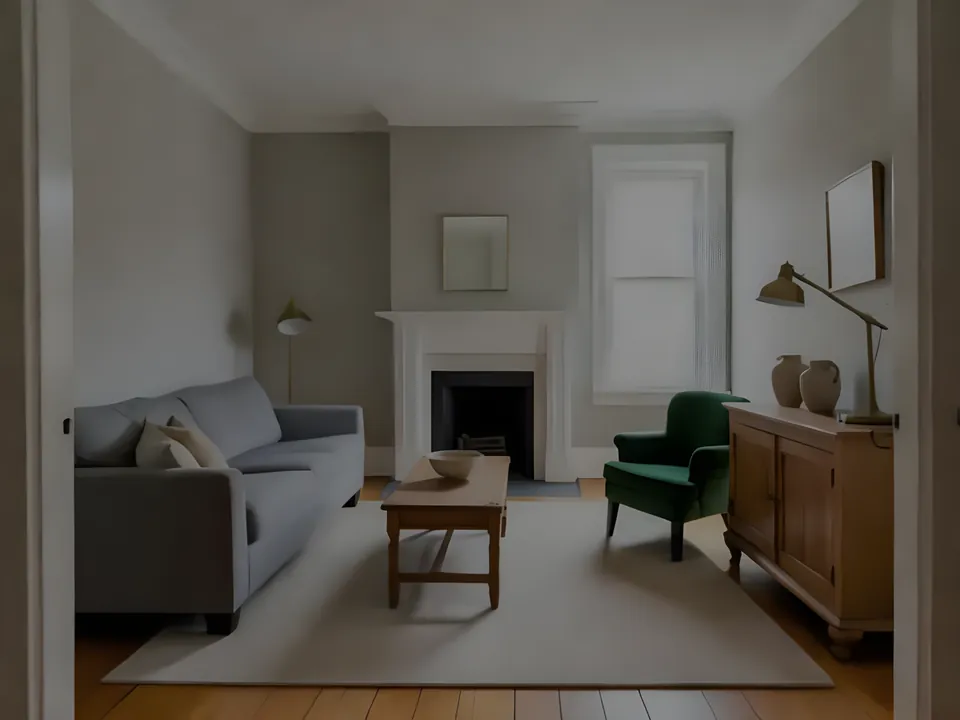
Settings: Option: Standard Enhancement; Enhancement Strength: Medium; quality: Low
Noise Reduction, Medium
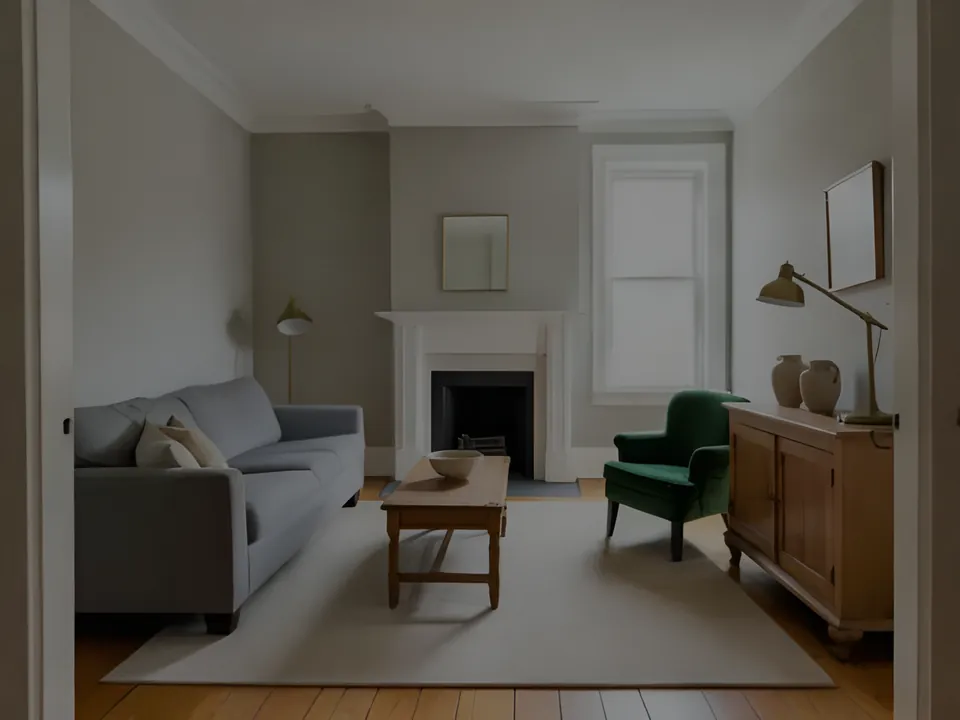
Settings: Option: Noise Reduction; Enhancement Strength: Medium; quality: Low
Detail Enhancement, Medium
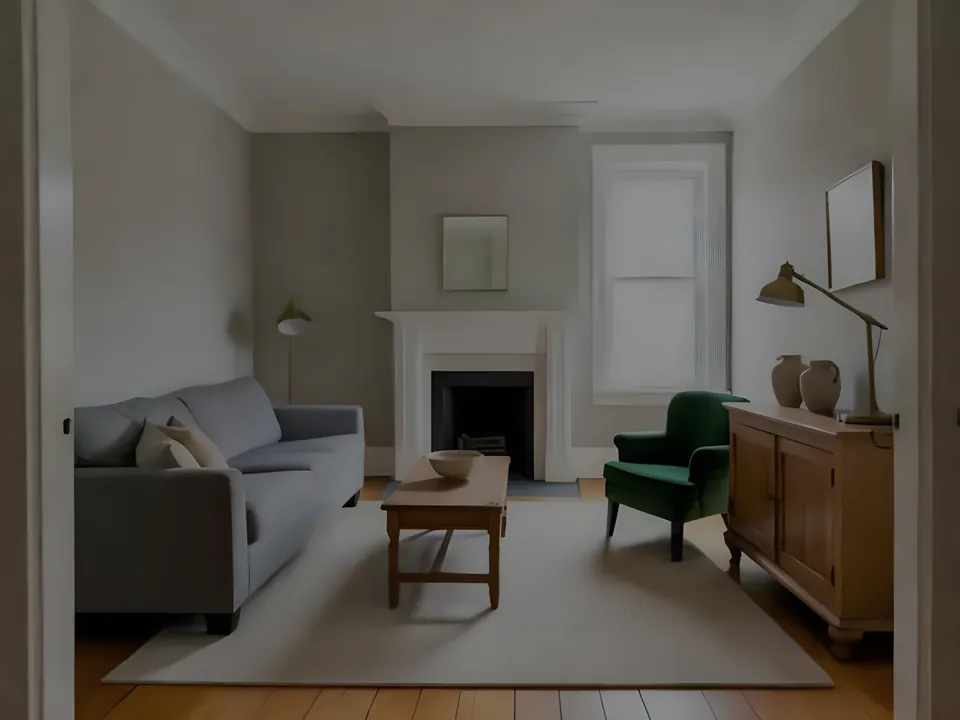
Settings: Option: Detail Enhancement; Enhancement Strength: Medium; quality: Low
Noise Reduction was the only option that looked different on our grainy photo. Standard and Detail Enhancement, at Medium and at High, gave the same picture. All of them made the photo bigger and cleaner, none of them made it brighter, and all of them smoothed real texture, so brighten the photo first and check floors and fabrics at full size before you publish.
What the Enhancement tool does and does not do
Our Enhancement tool is an upscaler. It takes your photo with no prompt and returns it larger and cleaner, using the option and strength you choose. It is useful when a photo is small, soft or grainy.
- It does not have exposure, white balance, colour, straightening or perspective controls.
- It does not merge bracketed exposures, replace skies, remove objects or add furniture.
- It cannot recover what the camera never captured. An upscaler fills in plausible detail, and plausible is not the same as true.
- The result panel also offers actions such as Remove Background, Edit Image and Change Paint. Those change the content of the photo, so treat them as edits to disclose, not as enhancement.
Enhance the photo, do not edit the truth
A listing photo has one job: show a buyer what they would be buying. Fixing the light, sharpening a soft file and reducing grain help with that. Hiding a defect does the opposite, and in some places it is a legal problem, not only a trust problem.
As a rule of thumb, lighting, exposure, colour balance, cropping, straightening, sharpening and resizing are treated as lighter edits. Adding, removing or changing furniture, floors, fixtures, walls, landscaping or the view usually has to be disclosed. In California, since 1 January 2026, ads using a digitally altered image must say so and make the original available. Other MLSs have their own wording and penalties.
- Never smooth away, crop out or retouch damp, cracks, stains, damage or a bad view.
- Do not change permanent features: floors, counters, walls, windows, room size, the pool or the garden.
- Keep the unedited original and upload it too if your MLS asks for it.
- Label virtually staged or altered photos the way your MLS requires, on the image or in the caption.
- Read your MLS and brokerage photo rules before you publish. They change, and this guide is not legal advice.
Frequently asked questions
How do I enhance real estate photos with AI?
Shoot at full resolution with the lights on, fix brightness, colour and crooked lines in a photo editor, then upload the photo to an enhancement tool, choose an option, check the result at full size next to the original and label any real edits in your listing.
Can AI fix a dark real estate photo?
Not with our Enhancement tool. It is an upscaler and has no exposure or colour controls. Brighten the photo in an editor first, or reshoot with the lights on. A Noise Reduction run afterwards can help with the grain a brightened photo shows.
Is it okay to use AI-enhanced photos on the MLS?
Usually yes, if the photo still shows the property as it is. Light and sharpness fixes are generally seen as acceptable. Changing or hiding what the property looks like is not, and it may need to be disclosed. Check your own MLS rules.
Do I have to say a listing photo was edited?
Often, if the edit changes what the property looks like, such as virtual staging or removing objects. Some places also ask for the original photo. Light and colour fixes and sharpening are usually treated more lightly, but the rules differ by MLS and region, so check yours.
Which option should I choose for a listing photo?
Use Noise Reduction for grainy, dim photos and Standard Enhancement for a basic clean-up and a bigger file. In our test, Detail Enhancement gave the same result as Standard. Leave the strength on Medium and check the result at full size.
Is the Enhancement tool free?
You can try it free: sign in with Google or email and new accounts get 1 free render. Free results are watermarked, and the Medium (PRO) and High (PRO) quality settings and "No watermark (PRO)" need a paid plan.
Enhance your first listing photo
Fix the light first, then run one soft or grainy photo through Noise Reduction or Standard Enhancement at Medium strength. Check it at full size, keep the original and label it if your MLS asks.
Enhance a listing photoRelated: Real estate rendering · Virtual staging guide · Choosing exterior paint colours